|

Making a Coloured Pencil Sketch using PI 10
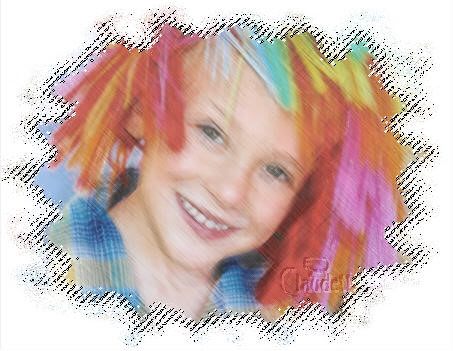
Photo of my little cousin
This tutorial was inspired by the
PSP tutorial
by Estazia |
|
This is my first tutorial in PI so if you know of a better
or easier way of doing something please do it! :-)
Software: PI Version 10
Author: Claudette Holden
Terms of USE
Tester:
Paula
Homepage:
PI Home
Title: Effects/Filters
Skill Level: Beginner
Featured tools: Colour Charcoal
Effect
What you Need: Your own photo
|
Necessary Download: Coloured Pencils Stamp

or
 |
1.
2. |
- 1.Open the photo that you want to use.
- Edit > copy
2. OPEN a new canvas size 450x350, transparent and click on Selection
>ALL
- 3. In this blank canvas click on
- Edit> Paste into selection
Note: Make sure you have your layer manager
open and you now should have two layers, one with your picture (obj-1) and
one Base. 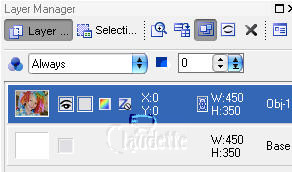
|
4.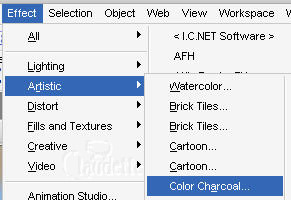 |
4. Click on Effect > Artistic>Colour Charcoal
and use these settings:
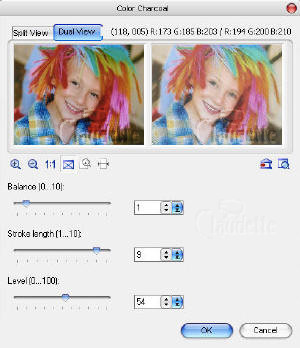
- Balance: 1
- Stroke length: 9
- Level :54
- NOTE: depending on your photo you can
lighten it or darken it by moving the balance number. Play around with
this step.
click OK when you are happy with your result. |
5.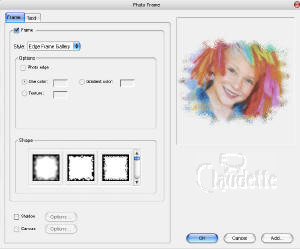 |
- 5.Click on Photo> Photo Frame
- Style: edge frame gallery
- and choose
 - (scroll down once in the shape area,
- it is the first one on the left)
- or one of your choosing and Click Enter
|
|
6.
|
6.Now in your Layer Manager click on the background
(BASE) layer
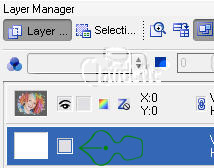
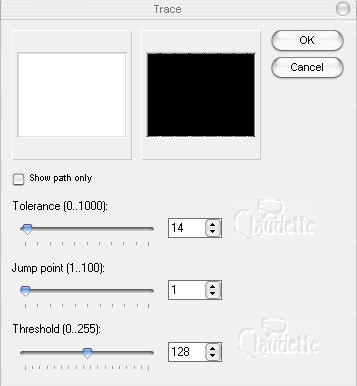
Selection> ALL then Edit> trace edges> selection Marquee
Use these settings:

Tolerance 14
Jump Point 1
Threshold 128
|
7. |
7. click on Your Material Gallery> Paper>R10
and double click on
it.
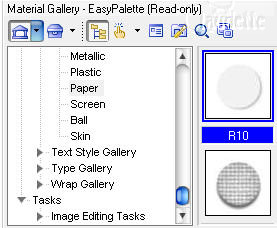
Right click on your
paper layer (base), choose ARRANGE and send to the back
 |
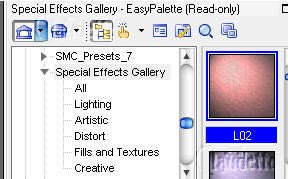
8. |
8. Still working on the background Click on
your Special Effects Gallery
choose L02 and click on it.
|
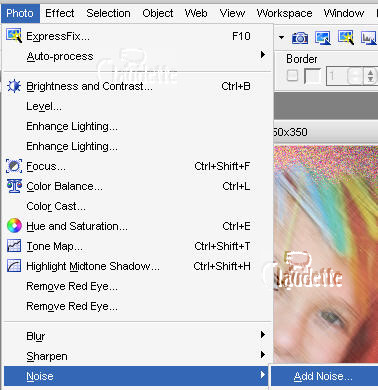
9. |
9.You can add some noise if you like
Photo>noise> add noise
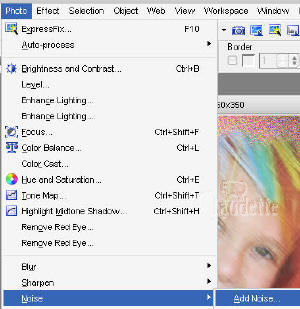
Click on Photo> Sharpen> Sharpen |
10. |
10. Now Add the coloured pencil STAMP to
your Stamp Gallery and select it. (click on the stamp tool
then click on the tiny down arrow next to the apple and click on Add
stamp
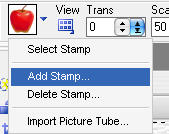
Find where you put the coloured pencil stamp and click on it
(see below)
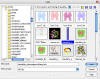
click to see large version
Scale 50
Add some coloured pencils to your drawing.
Use the Transform tool to move them to the position you want.. and give
each a shadow.
Object> Shadow.
You are finished!
|
| When you have
completed this tutorial, you may download and display this award on your web
page. Right-click on image and save to your hard drive. Please DO NOT link
directly to the award. |
This award is being offered
on the honour system.
Please DO NOT
link directly to the award. |
|
 |
|
©2005 Claudette Holden
|


